ChuanGoing 2019-11-17
這篇原本想把事務處理、日誌處理、錯誤處理、授權與鑒權一併介紹完的,授權和鑒權我想結合自定義權限來介紹,全部放到這裏篇幅可能太長,因此權限部分將會在下篇來介紹。先說下我接下來的打算把,下篇將介紹權限控制,結合Oauth2.0和OpenId(OIDC)以及自定義權限來介紹;完了後會結合之前所介紹的基礎來實現一個簡單的電商網站,當然是利用領域驅動設計來實現。我的這個系列的主題就是領域驅動設計,實現簡單電商網站時將會深入的講解下領域的劃分原則及領域服務的場景,中間可能會嘗試部分業務實現事件驅動。
本篇學習曲線:
1.日誌記錄
2.錯誤處理
3.事務處理
日誌記錄
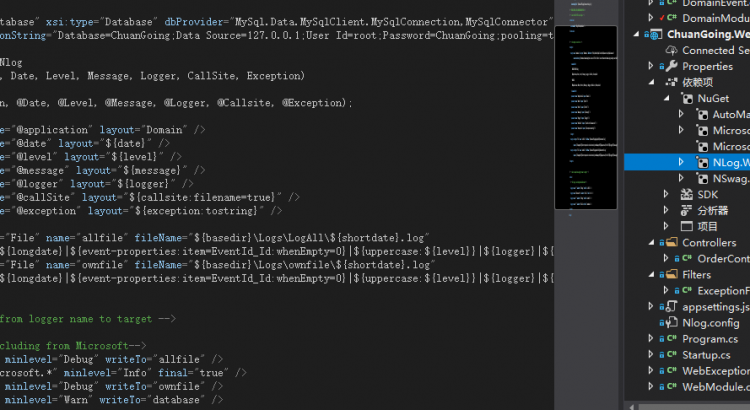
NLog是一個記錄日誌組件,和log4net一樣被廣泛使用,它可以將日誌保存到文本文件、CSV、控制台、VS調試窗口、數據庫等。在之前例子中的WebApi項目中添加NLog.Web.AspNetCore的Nuget包,並添加如下配置:
簡單介紹下配置信息,“targets”配置每個輸出配置,我這裡有3個輸出:database、allfile、ownfile,分別表示輸出到數據庫和對應路徑的日誌文件下。
“rules”規則配置了4條:
1.將Debug以上級別(含)信息輸出到allfile
2.忽略Microsoft.*開頭的信息(對應的輸出沒有配置到任何文件),此配置一般忽略即可
3.將Debug以上級別(含)信息輸出到ownfile(注意這裏配置和allfile一樣,一般配置級別高點的日誌信息)
4.將Warn以上級別(含)信息輸出到數據庫
完了后,在Program.cs Main方法裏面註冊NLog:
var logger = NLogBuilder.ConfigureNLog($"Nlog.config").GetCurrentClassLogger();
            try
            {
                CreateWebHostBuilder(args).Build().Run();
            }
            catch (Exception ex)
            {
                logger.Error(ex, "Stopped program because of exception");
                throw ex;
            }
            finally
            {
                NLog.LogManager.Shutdown();
            }
注意不要忘了啟用NLog組件使之生效
在OrderController的Add方法中加入以下代碼:
用postman簡單測試下,我們可以看到執行目錄中多出來了日誌信息
錯誤處理
這裏一般我們關心的錯誤大概有兩類:
1.內部錯誤,即通過框架(Mvc)管道準確的傳入到內部系統中併發生錯誤的此類信息
2.框架(Mvc)執行管道的某些中間件時發生的錯誤或被中間件禁止繼續訪問的請求
因此,定義如下3個類:
public class InnerException : Exception
    {
        /// <summary>
        /// 內部錯誤代碼
        /// </summary>
        public int? ErrorCode { get; }

        public InnerException(int errorCode) : base()
        {
            ErrorCode = errorCode;
        }

        public InnerException(int errorCode, string message) : base(message)
        {
            ErrorCode = errorCode;
        }

        public InnerException(int code, string message, Exception exception) : base(message, exception)
        {
            ErrorCode = code;
        }
    }
InnerException
public class MessageCodes
    {
        #region 公用

        /// <summary>
        /// 成功
        /// </summary>
        public const int Success = 20101000;
        /// <summary>
        /// 警告
        /// </summary>
        public const int Warning = 20102000;
        /// <summary>
        /// 錯誤
        /// </summary>
        public const int Error = 20103000;
        /// <summary>
        /// 數據驗證錯誤
        /// </summary>
        public const int DataValidationError = 20104000;
        /// <summary>
        /// 數據不存在
        /// </summary>
        public const int DataNotFound = 20105000;
        /// <summary>
        /// 非法的數據狀態
        /// </summary>
        public const int IllegalState = 20106000;
        /// <summary>
        /// 參數無效
        /// </summary>
        public const int InvalidParams = 20107000;
        /// <summary>
        /// 輸入非法
        /// </summary>
        public const int IllegalInput = 20108000;
        /// <summary>
        /// 鑒權成功
        /// </summary>
        public const int AuthSuccess = 20109000;

        #endregion

    }
MessageCodes
 public class WebException: InnerException
    {
        public HttpStatusCode HttpStatus { get; set; }

        public HttpRequest Request { get; private set; }

        public WebException(HttpStatusCode httpStatus, int errorCode, string message)
             : base(errorCode, message)
        {
            HttpStatus = httpStatus;
        }

        public WebException(HttpStatusCode httpStatus, int errorCode, string message, HttpRequest request)
            : this(httpStatus, errorCode, message)
        {
            Request = request;
        }

        public WebException(int errorCode, string message)
            : base(errorCode, message)
        {
            HttpStatus = HttpStatusCode.BadRequest;
        }
    }
WebException
通過Aop,很方便就可以實現錯誤信息的處理:
public class ExceptionFilter : IExceptionFilter
    {
        private readonly ILogger<ExceptionFilter> _logger;

        public ExceptionFilter(ILogger<ExceptionFilter> logger)
        {
            _logger = logger;
        }

        public void OnException(ExceptionContext context)
        {
            _logger.LogError(context.Exception, context.Exception.Message);

            #region Ioc/automapper等中間件對錯誤信息進行了包裝,需要解包

            //web錯誤:驗證/鑒權等
            var webException = GetException<Base.Exceptions.WebException>(context.Exception);
            if (webException != null)
            {
                context.Result = new JsonResult(new
                {
                    ErrorCode = webException.ErrorCode ?? MessageCodes.Error,
                    webException.Message
                })
                {
                    StatusCode = (int)webException.HttpStatus
                };
                return;
            }
            //內部錯誤
            var exception = GetException<InnerException>(context.Exception);
            if (exception != null)
            {
                context.Result = new JsonResult(new
                {
                    ErrorCode = exception.ErrorCode ?? MessageCodes.Error,
                    exception.Message
                })
                {
                    StatusCode = (int)HttpStatusCode.InternalServerError
                };
                return;
            }

            #endregion
        }

        private TException GetException<TException>(Exception exception)
          where TException : Exception
        {
            if (exception == null)
            {
                return null;
            }
            if (exception is TException tException)
            {
                return tException;
            }
            else
            {
                return GetException<TException>(exception.InnerException);
            }
        }
    }
ExceptionFilter
同時,Startup.cs的ConfigureServices中註冊一下:
services.AddMvc(mvcOptions =>
                {
                    mvcOptions.Filters.Add<ExceptionFilter>();
                })
即完成了錯誤信息並且錯誤信息會寫入相應配置的輸出中。
事務處理
UnitOfWork又稱工作單元,為了保證數據操作完整性,我們將處理數據的的操作統一放在一個事務中,我們這裏利用UnitOfWork來實現事務處理。
首先定義IUnitOfWork及UnitOfWork實現:
 public interface IUnitOfWork
    {
        void Begin(IsolationLevel level = IsolationLevel.Unspecified);
        void SaveChanges();
        void Failed();
    }
View Code
public class UnitOfWork : IUnitOfWork
    {
        private ITransactionRepository _repository;

        public UnitOfWork(ITransactionRepository repository)
        {
            _repository = repository;
        }

        public virtual void Begin(IsolationLevel level = IsolationLevel.Unspecified)
        {
            _repository.BeginTransaction(level);
        }

        public virtual void SaveChanges()
        {
            _repository.Commit();
        }

        public virtual void Failed()
        {
            _repository.Rollback();
        }
    }
View Code
其中,UnitOfWork依賴於ITransactionRepository的實現:
public interface ITransactionRepository
    {
        /// <summary>
        /// 打開事務
        /// </summary>
        /// <param name="level"></param>
        void BeginTransaction(IsolationLevel level = IsolationLevel.Unspecified);
        /// <summary>
        /// 提交事務
        /// </summary>
        void Commit();
        /// <summary>
        /// 事務回滾
        /// </summary>
        void Rollback();
    }
ITransactionRepository
利用DapperRepository繼承ITransactionRepository並實現:
public virtual void BeginTransaction(IsolationLevel level = IsolationLevel.Unspecified)
        {
            DbContext.BeginTransaction(level);
        }

        public virtual void Commit()
        {
            DbContext.Commit();
        }

        public virtual void Rollback()
        {
            DbContext.RollBack();
        }
View Code
基本功能實現后,如何使用呢?這裏還是需要利用Aop:
public class UnitOfWorkAttribute : AbstractInterceptorAttribute
    {
        public override Task Invoke(AspectContext context, AspectDelegate next)
        {
            if (context.Implementation is IApplicationService applicationService)
            {
                var uow = applicationService.UnitOfWork;
                uow.Begin();
                var aspectDelegate = next(context);
                if (aspectDelegate.Exception != null)
                {
                    uow.Failed();
                    throw aspectDelegate.Exception;
                }
                else
                {
                    uow.SaveChanges();
                    return aspectDelegate;
                }
            }
            else
            {
                return next(context);
            }
        }
    }
UnitOfWorkAttribute
因此,我們還需要在Application項目中添加如下代碼:
 public class ServiceBase<TEntity, TPrimaryKey> : IApplicationService
        where TEntity : class, IEntity<TPrimaryKey>
    {
        protected IMapper Mapper { get; private set; }
        public virtual IUnitOfWork UnitOfWork { get; private set; }

        public ServiceBase(IComponentContext container, ICommandRepository<TEntity, TPrimaryKey> repository)
        {
            Mapper = container.Resolve<IMapper>();
            UnitOfWork = container.Resolve<IUnitOfWork>(new TypedParameter(typeof(ITransactionRepository), repository));
        }
    }
ServiceBase
Application中的每個服務去繼承上面的ServiceBase,因此每個Application服務都具有了事務處理能力
 public interface IOrderService : IScopeInstance
    {
        [UnitOfWork]
        void Add(OrderViewModel order);
        OrderViewResult Get(string sn);
    }
程序運行時,Add方法前後形成切面,如下圖所示,next(context)這裏執行的就是Add方法,執行前開啟事務,執行后提交
利用Aop特性切面實現事務的無感注入(Ioc/DI小節中引入了AspectCore動態代理),底層還是依賴IDbConnection的事務相關接口,完整的事務處理大概就是這樣了。
詳細代碼在Github的 的Domain分支可以找到。
本站聲明:網站內容來源於博客園,如有侵權,請聯繫我們,我們將及時處理
【其他文章推薦】
※如何讓商品強力曝光呢? 網頁設計公司幫您建置最吸引人的網站,提高曝光率!!
※網頁設計一頭霧水??該從何著手呢? 找到專業技術的網頁設計公司,幫您輕鬆架站!
※想知道最厲害的台北網頁設計公司推薦、台中網頁設計公司推薦專業設計師”嚨底家”!!