TFRecord 是 tensorflow 內置的文件格式,它是一種二進制文件,具有以下優點:
1. 統一各種輸入文件的操作
2. 更好的利用內存,方便複製和移動
3. 將二進制數據和標籤(label)存儲在同一個文件中
引言
在了解如下操作後進一步詳細講解TFRecord
tf.train.Int64List(value=list_data)
它的作用是 把 list 中每個元素轉換成 key-value 形式,
注意,輸入必須是 list,且 list 中元素類型要相同,且與 Int 保持一致;
# value = tf.constant([1, 2])     ### 這會報錯的
ss = 1               ### Int64List 對應的元素只能是 int long,其他同理
tt = 2
out1 = tf.train.Int64List(value = [ss, tt])
print(out1)
# value: 1
# value: 2

ss = [1 ,2]
out2 = tf.train.Int64List(value = ss)
print(out2)
# value: 1
# value: 2
同類型的 方法還有 2 個
tf.train.FloatList
tf.train.BytesList
tf.train.Feature(int64_list=)
它的作用是 構建 一種類型的特徵集,比如 整型
out = tf.train.Feature(int64_list=tf.train.Int64List(value=[33, 22]))
print(out)
# int64_list {
#   value: 33
#   value: 22
# }
也可以是其他類型
tf.train.Feature(float_list=tf.train.FloatList())
tf.train.Feature(bytes_list=tf.train.BytesList())
tf.train.Features(feature=dict_data)
它的作用是 構建 多種類型 的特徵集,可以 dict 格式表達 多種類型
ut = tf.train.Features(feature={
                            "suibian": tf.train.Feature(int64_list=tf.train.Int64List(value=[1, 2, 4])),
                            "a": tf.train.Feature(float_list=tf.train.FloatList(value=[5., 7.]))
                        })
print(out)
# feature {
#   key: "a"
#   value {
#     float_list {
#       value: 5.0
#       value: 7.0
#     }
#   }
# }
# feature {
#   key: "suibian"
#   value {
#     int64_list {
#       value: 1
#       value: 2
#       value: 4
#     }
#   }
# }
tf.train.Example(features=tf.train.Features())
它的作用是創建一個 樣本,Example 對應一個樣本
example = tf.train.Example(features=
                           tf.train.Features(feature={
                               'a': tf.train.Feature(int64_list=tf.train.Int64List(value=range(2))),
                               'b': tf.train.Feature(bytes_list=tf.train.BytesList(value=[b'm',b'n']))
                           }))
print(example)
# features {
#   feature {
#     key: "a"
#     value {
#       int64_list {
#         value: 0
#         value: 1
#       }
#     }
#   }
#   feature {
#     key: "b"
#     value {
#       bytes_list {
#         value: "m"
#         value: "n"
#       }
#     }
#   }
# }
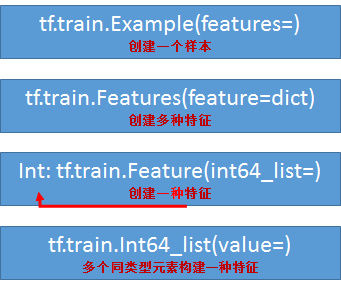
一幅圖總結一下上面的代碼
Example 協議塊
它其實是一種 數據存儲的 格式,類似於 xml、json 等;
用上述方法實現該格式;
一個 Example 協議塊對應一個樣本,一個樣本有多種特徵,每種特徵下有多個元素,可參看上圖;
message Example{
    Features features = 1;
}
message Features{
    map<string,Features> feature = 1;
}
message Feature {
    oneof kind {
        BytesList bytes_list = 1;
        FloateList float_list = 2;
        Int64List int64_list = 3;
    }
}
TFRecord 文件就是以 Example協議塊 格式 存儲的;
TFRecord 文件
該類文件具有寫功能,且可以把其他類型的文件轉換成該類型文件,其實相當於先讀取其他文件,再寫入 TFRecord 文件;
該類文件也具有讀功能;
TFRecord 存儲
存儲分兩步:
1.建立存儲器
2. 構造每個樣本的 Example 協議塊
tf.python_io.TFRecordWriter(file_name)
構造存儲器,存儲器有兩個常用方法
- write(record):向文件中寫入一個樣本
- close():關閉存儲器
注意:此處的 record 為一個序列化的 Example,通過 Example.SerializeToString()來實現,它的作用是將 Example 中的 map 壓縮為二進制,節約大量空間
示例代碼1:將 MNIST 數據集保存成 TFRecord 文件
import tensorflow as tf
import numpy as np
import input_data


# 生成整數型的屬性
def _int64_feature(value):
    return tf.train.Feature(int64_list = tf.train.Int64List(value = [value]))

# 生成字符串類型的屬性,也就是圖像的內容
def _string_feature(value):
    return tf.train.Feature(bytes_list = tf.train.BytesList(value = [value]))

# 讀取圖像數據 和一些屬性
mniset = input_data.read_data_sets('../../../data/MNIST_data',dtype=tf.uint8, one_hot=True)
images = mniset.train.images
labels = mniset.train.labels
pixels = images.shape[1]        # (55000, 784)
num_examples = mniset.train.num_examples        # 55000

file_name = 'output.tfrecords'          ### 文件名
writer = tf.python_io.TFRecordWriter(file_name)     ### 寫入器

for index in range(num_examples):
    ### 遍歷樣本
    image_raw = images[index].tostring()        ### 圖片轉成 字符型
    example = tf.train.Example(features = tf.train.Features(feature = {
        'pixel': _int64_feature(pixels),
        'label': _int64_feature(np.argmax(labels[index])),
        'image_raw': _string_feature(image_raw)
    }))
    writer.write(example.SerializeToString())       ### 寫入 TFRecord
writer.close()
示例代碼2:將 csv 保存成 TFRecord 文件
train_frame = pd.read_csv("../myfiles/xx3.csv")
train_labels_frame = train_frame.pop(item="label")
train_values = train_frame.values
train_labels = train_labels_frame.values
print("values shape: ", train_values.shape)     # values shape:  (2, 3)
print("labels shape:", train_labels.shape)      # labels shape: (2,)

writer = tf.python_io.TFRecordWriter("xx3.tfrecords")

for i in range(train_values.shape[0]):
    image_raw = train_values[i].tostring()
    example = tf.train.Example(
        features=tf.train.Features(
            feature={
                "image_raw": tf.train.Feature(bytes_list=tf.train.BytesList(value=[image_raw])),
                "label": tf.train.Feature(int64_list=tf.train.Int64List(value=[train_labels[i]]))
            }
        )
    )
    writer.write(record=example.SerializeToString())
writer.close()
示例3:將 png 文件保存成 TFRecord 文件
# filenames = tf.train.match_filenames_once('../myfiles/*.png')
filenames = glob.iglob('..\myfiles\*.png')

writer = tf.python_io.TFRecordWriter('png.tfrecords')

for filename in filenames:
    img = Image.open(filename)
    img_raw = img.tobytes()
    label = 1
    example = tf.train.Example(
        features=tf.train.Features(
            feature={
                "image_raw": tf.train.Feature(bytes_list=tf.train.BytesList(value=[img_raw])),
                "label": tf.train.Feature(int64_list=tf.train.Int64List(value=[label]))
            }
        )
    )
    writer.write(record=example.SerializeToString())
writer.close()
TFRecord 讀取
參考鏈接:https://www.cnblogs.com/nbk-zyc/p/13159986.html(案例6)、https://www.cnblogs.com/nbk-zyc/p/13168313.html
tf.TFRecordReader()
建立讀取器,有 read 和 close 方法
tf.parse_single_example(serialized,features=None,name= None)
解析單個 Example 協議塊
- serialized : 標量字符串的Tensor,一個序列化的Example,文件經過文件閱讀器之後的value
- features :字典數據,key為讀取的名字,value為FixedLenFeature
- return : 一個鍵值對組成的字典,鍵為讀取的名字
features中的value還可以為tf.VarLenFeature(),但是這種方式用的比較少,它返回的是SparseTensor數據,這是一種只存儲非零部分的數據格式,了解即可。
tf.FixedLenFeature(shape,dtype)
- shape : 輸入數據的形狀,一般不指定,為空列表
- dtype : 輸入數據類型,與存儲進文件的類型要一致,類型只能是float32,int 64, string
- return : 返回一個定長的 Tensor (即使有零的部分也存儲)
示例代碼
filename = 'png.tfrecords'
file_queue = tf.train.string_input_producer([filename], shuffle=True)

reader = tf.TFRecordReader()
key, value = reader.read(file_queue)

### features 的 key 必須和 寫入時 一致,數據類型也必須一致,shape 可為 空
dict_data= tf.parse_single_example(value, features={'label': tf.FixedLenFeature(shape=(1,1), dtype=tf.int64),
                                                        'image_raw': tf.FixedLenFeature(shape=(), dtype=tf.string)})
label = tf.cast(dict_data['label'], tf.int32)
img = tf.decode_raw(dict_data['image_raw'], tf.uint8)       ### 將 string、bytes 轉換成 int、float

image_tensor = tf.reshape(img, [500, 500, -1])

sess = tf.Session()
sess.run(tf.local_variables_initializer())
tf.train.start_queue_runners(sess=sess)

while 1:
    # print(sess.run(key))        # b'png.tfrecords:0'
    image = sess.run(image_tensor)
    img_PIL = Image.fromarray(image)
    img_PIL.show()
參考資料:
https://blog.csdn.net/chengshuhao1991/article/details/78656724
https://www.cnblogs.com/yanshw/articles/12419616.html
,
TFRecord 是 tensorflow 內置的文件格式,它是一種二進制文件,具有以下優點:
1. 統一各種輸入文件的操作
2. 更好的利用內存,方便複製和移動
3. 將二進制數據和標籤(label)存儲在同一個文件中
引言
在了解如下操作後進一步詳細講解TFRecord
tf.train.Int64List(value=list_data)
它的作用是 把 list 中每個元素轉換成 key-value 形式,
注意,輸入必須是 list,且 list 中元素類型要相同,且與 Int 保持一致;
# value = tf.constant([1, 2])     ### 這會報錯的
ss = 1               ### Int64List 對應的元素只能是 int long,其他同理
tt = 2
out1 = tf.train.Int64List(value = [ss, tt])
print(out1)
# value: 1
# value: 2

ss = [1 ,2]
out2 = tf.train.Int64List(value = ss)
print(out2)
# value: 1
# value: 2
同類型的 方法還有 2 個
tf.train.FloatList
tf.train.BytesList
tf.train.Feature(int64_list=)
它的作用是 構建 一種類型的特徵集,比如 整型
out = tf.train.Feature(int64_list=tf.train.Int64List(value=[33, 22]))
print(out)
# int64_list {
#   value: 33
#   value: 22
# }
也可以是其他類型
tf.train.Feature(float_list=tf.train.FloatList())
tf.train.Feature(bytes_list=tf.train.BytesList())
tf.train.Features(feature=dict_data)
它的作用是 構建 多種類型 的特徵集,可以 dict 格式表達 多種類型
ut = tf.train.Features(feature={
                            "suibian": tf.train.Feature(int64_list=tf.train.Int64List(value=[1, 2, 4])),
                            "a": tf.train.Feature(float_list=tf.train.FloatList(value=[5., 7.]))
                        })
print(out)
# feature {
#   key: "a"
#   value {
#     float_list {
#       value: 5.0
#       value: 7.0
#     }
#   }
# }
# feature {
#   key: "suibian"
#   value {
#     int64_list {
#       value: 1
#       value: 2
#       value: 4
#     }
#   }
# }
tf.train.Example(features=tf.train.Features())
它的作用是創建一個 樣本,Example 對應一個樣本
example = tf.train.Example(features=
                           tf.train.Features(feature={
                               'a': tf.train.Feature(int64_list=tf.train.Int64List(value=range(2))),
                               'b': tf.train.Feature(bytes_list=tf.train.BytesList(value=[b'm',b'n']))
                           }))
print(example)
# features {
#   feature {
#     key: "a"
#     value {
#       int64_list {
#         value: 0
#         value: 1
#       }
#     }
#   }
#   feature {
#     key: "b"
#     value {
#       bytes_list {
#         value: "m"
#         value: "n"
#       }
#     }
#   }
# }
一幅圖總結一下上面的代碼
Example 協議塊
它其實是一種 數據存儲的 格式,類似於 xml、json 等;
用上述方法實現該格式;
一個 Example 協議塊對應一個樣本,一個樣本有多種特徵,每種特徵下有多個元素,可參看上圖;
message Example{
    Features features = 1;
}
message Features{
    map<string,Features> feature = 1;
}
message Feature {
    oneof kind {
        BytesList bytes_list = 1;
        FloateList float_list = 2;
        Int64List int64_list = 3;
    }
}
TFRecord 文件就是以 Example協議塊 格式 存儲的;
TFRecord 文件
該類文件具有寫功能,且可以把其他類型的文件轉換成該類型文件,其實相當於先讀取其他文件,再寫入 TFRecord 文件;
該類文件也具有讀功能;
TFRecord 存儲
存儲分兩步:
1.建立存儲器
2. 構造每個樣本的 Example 協議塊
tf.python_io.TFRecordWriter(file_name)
構造存儲器,存儲器有兩個常用方法
- write(record):向文件中寫入一個樣本
- close():關閉存儲器
注意:此處的 record 為一個序列化的 Example,通過 Example.SerializeToString()來實現,它的作用是將 Example 中的 map 壓縮為二進制,節約大量空間
示例代碼1:將 MNIST 數據集保存成 TFRecord 文件
import tensorflow as tf
import numpy as np
import input_data


# 生成整數型的屬性
def _int64_feature(value):
    return tf.train.Feature(int64_list = tf.train.Int64List(value = [value]))

# 生成字符串類型的屬性,也就是圖像的內容
def _string_feature(value):
    return tf.train.Feature(bytes_list = tf.train.BytesList(value = [value]))

# 讀取圖像數據 和一些屬性
mniset = input_data.read_data_sets('../../../data/MNIST_data',dtype=tf.uint8, one_hot=True)
images = mniset.train.images
labels = mniset.train.labels
pixels = images.shape[1]        # (55000, 784)
num_examples = mniset.train.num_examples        # 55000

file_name = 'output.tfrecords'          ### 文件名
writer = tf.python_io.TFRecordWriter(file_name)     ### 寫入器

for index in range(num_examples):
    ### 遍歷樣本
    image_raw = images[index].tostring()        ### 圖片轉成 字符型
    example = tf.train.Example(features = tf.train.Features(feature = {
        'pixel': _int64_feature(pixels),
        'label': _int64_feature(np.argmax(labels[index])),
        'image_raw': _string_feature(image_raw)
    }))
    writer.write(example.SerializeToString())       ### 寫入 TFRecord
writer.close()
示例代碼2:將 csv 保存成 TFRecord 文件
train_frame = pd.read_csv("../myfiles/xx3.csv")
train_labels_frame = train_frame.pop(item="label")
train_values = train_frame.values
train_labels = train_labels_frame.values
print("values shape: ", train_values.shape)     # values shape:  (2, 3)
print("labels shape:", train_labels.shape)      # labels shape: (2,)

writer = tf.python_io.TFRecordWriter("xx3.tfrecords")

for i in range(train_values.shape[0]):
    image_raw = train_values[i].tostring()
    example = tf.train.Example(
        features=tf.train.Features(
            feature={
                "image_raw": tf.train.Feature(bytes_list=tf.train.BytesList(value=[image_raw])),
                "label": tf.train.Feature(int64_list=tf.train.Int64List(value=[train_labels[i]]))
            }
        )
    )
    writer.write(record=example.SerializeToString())
writer.close()
示例3:將 png 文件保存成 TFRecord 文件
# filenames = tf.train.match_filenames_once('../myfiles/*.png')
filenames = glob.iglob('..\myfiles\*.png')

writer = tf.python_io.TFRecordWriter('png.tfrecords')

for filename in filenames:
    img = Image.open(filename)
    img_raw = img.tobytes()
    label = 1
    example = tf.train.Example(
        features=tf.train.Features(
            feature={
                "image_raw": tf.train.Feature(bytes_list=tf.train.BytesList(value=[img_raw])),
                "label": tf.train.Feature(int64_list=tf.train.Int64List(value=[label]))
            }
        )
    )
    writer.write(record=example.SerializeToString())
writer.close()
TFRecord 讀取
參考鏈接:https://www.cnblogs.com/nbk-zyc/p/13159986.html(案例6)、https://www.cnblogs.com/nbk-zyc/p/13168313.html
tf.TFRecordReader()
建立讀取器,有 read 和 close 方法
tf.parse_single_example(serialized,features=None,name= None)
解析單個 Example 協議塊
- serialized : 標量字符串的Tensor,一個序列化的Example,文件經過文件閱讀器之後的value
- features :字典數據,key為讀取的名字,value為FixedLenFeature
- return : 一個鍵值對組成的字典,鍵為讀取的名字
features中的value還可以為tf.VarLenFeature(),但是這種方式用的比較少,它返回的是SparseTensor數據,這是一種只存儲非零部分的數據格式,了解即可。
tf.FixedLenFeature(shape,dtype)
- shape : 輸入數據的形狀,一般不指定,為空列表
- dtype : 輸入數據類型,與存儲進文件的類型要一致,類型只能是float32,int 64, string
- return : 返回一個定長的 Tensor (即使有零的部分也存儲)
示例代碼
filename = 'png.tfrecords'
file_queue = tf.train.string_input_producer([filename], shuffle=True)

reader = tf.TFRecordReader()
key, value = reader.read(file_queue)

### features 的 key 必須和 寫入時 一致,數據類型也必須一致,shape 可為 空
dict_data= tf.parse_single_example(value, features={'label': tf.FixedLenFeature(shape=(1,1), dtype=tf.int64),
                                                        'image_raw': tf.FixedLenFeature(shape=(), dtype=tf.string)})
label = tf.cast(dict_data['label'], tf.int32)
img = tf.decode_raw(dict_data['image_raw'], tf.uint8)       ### 將 string、bytes 轉換成 int、float

image_tensor = tf.reshape(img, [500, 500, -1])

sess = tf.Session()
sess.run(tf.local_variables_initializer())
tf.train.start_queue_runners(sess=sess)

while 1:
    # print(sess.run(key))        # b'png.tfrecords:0'
    image = sess.run(image_tensor)
    img_PIL = Image.fromarray(image)
    img_PIL.show()
參考資料:
https://blog.csdn.net/chengshuhao1991/article/details/78656724
https://www.cnblogs.com/yanshw/articles/12419616.html
本站聲明:網站內容來源於博客園,如有侵權,請聯繫我們,我們將及時處理
【其他文章推薦】
※網頁設計公司推薦不同的風格,搶佔消費者視覺第一線
※廣告預算用在刀口上,台北網頁設計公司幫您達到更多曝光效益
※自行創業缺乏曝光? 網頁設計幫您第一時間規劃公司的形象門面
※南投搬家公司費用需注意的眉眉角角,別等搬了再說!
※教你寫出一流的銷售文案?
※聚甘新